|
|
|
Who's Online
There currently are 5614 guests and
1 member online. |
|
Categories
|
|
Information
|
|
Featured Product
|
|
|
 |
|
|
There are currently no product reviews.
 ;
Being a user of older radios of many kinds, preferring them over more modern rigs, this manual was invaluable in the programming of my two. I now know for certain what the assorted buttons functions are, and am very grateful to have found this excellent site. Many thanks for your assistance, Tony.
 ;
Clear and easy to read. All details as expected. Price acceptable , and quick delivery.
;
Quick response and exactly what I was looking for and at a great fair price!
;
5 star quality on these downloadable manuals. Easy to read and all the information is there. A must when doing a custom install or needing to service your precious old school electronics.
;
So usefull to make my installation a breeze. 5 stars on quality.
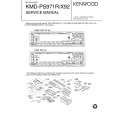
English
Removing the Unit s Removing the hard rubber frame
Insert the removal tool into the indentations in the hard rubber frame, and pull it gently until the lock is released.
s Removing the Unit 1 Make the faceplate control panel appear.
NOTE
When the control panel of the faceplate is hidden, the unit will be locked by the sleeve, making it more difficult to remove the unit. 2 Refer to the section �Removing the hard rubber frame� and then remove the hard rubber frame.
3 Remove the screw (M4�8) on the back panel. 4 Insert the removal tool deeply, as illustrated, with the L on the
left and the R on the right.
Accessory4 Removal tool Screw (M4X8) (commercially available)
L
Accessory2 Removal tool
5 Push upward the both
tools, as shown, and pull the unit toward you until it is halfway out. The unit may drop if you pull it out completely.
L
6 Pull the unit all the way out
with your hands, being careful not to drop it.
L
� 44 �
|
|
|
> |
|