|
|
|
Who's Online
There currently are 6041 guests and
2 members online. |
|
Categories
|
|
Information
|
|
Featured Product
|
|
|
 |
|
|
There are currently no product reviews.
 ;
The manual was exactly what I wanted and I found it nowhere else. Thanks!
;
Having purchased a 1994 Kenwood music system from a Charity shop in 2013 (it was a high end product in its day), I found myself not quite knowing where to plug in what, and how to do this, that and the next thing. I needed a Manual, and after failure with another online 'Manual provider' I found Owner Manuals dot com. Well, I wasn't sure, but it was only $5, and if things didn't work out, I wouldn't have lost much...
But things DID work out. After paying my childrens inheritance money, $4.99, I was sent a Manual for my Kenwood System very quickly. Alas, it was in German, and being Scottish, I could not read it or get my system in order from it...a rapid email to them brought the English Manual in short order, and my retro-system was and IS up and running in it's regulation settings.
I am very grateful to http://www.owner-manuals.com for their quick service and for even having such an obsolete Manual in the first place! If you need a Manual for ANYTHING, try here first. I wouldn't be surprised if I bought a 1928 Marconi radio, and got the user Manual for THAT here too!
Top marks.
John Copeland
Glasgow
Scotland
;
I was so happy that the owner's manual was available. It is well written and helped me to use the radio/CD player/recorder without problems. Thanks for making it available.
Irene Lambert
;
Excellant!!! Very quick and easy....Best $4.99 I have spent in a very long time..
I highly recommend this.
;
Thanks so much for the Owner's manual for my Sony PS - FL1. I had purchased the turntable off of eBay. It came in and looked great. Packed well and appeared to be great. I balanced and aligned the tone are and hooked it up. When trying to play a record the tone are would move to the right place and just before it would drop to play it moved back off the edge of the record before touching down. I searched the net for an answer to this issue. No luck. Then I purchased the owners manual and sure enough there was a place to adjust where the stylus touched down. That adjustment solved the problem and saved me a $35 feet to have the player checked out. The manual is well written and easy to understand. It is a must have for anyone with this front loading Sony turntable.
Installation
Accessories
Part name Self-tapping screws (ø5 � 18 mm) Terminal cover (Power terminal) Speaker level input cable Hexagon Wrench External View Number of Items 4 1 1 1
KAC-7252 only
Part name Remote cable Remote controller Mounting bracket Self-tapping screws (ø2.6 � 12 mm)
NOTE
External View
Number of Items 1 1 1 2
� The rear side cover is fixed and cannot be removed.
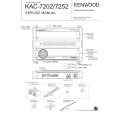
Installation procedure
Since there are large variety of settings and connections possible according to applications, read the instruction manual well to select the proper setting and connection. 1. Remove the ignition key and disconnect the negative - terminal of the battery to prevent short circuits. 2. Set the unit according to the intended usage. 3. Connect the input and output wires of the units. 4. Connect the speaker wires. 5. Connect the power wire, power control wire and grounding wire following this order. 6. Install the installation fittings in the unit. 7. Attach the unit. 8. Install the remote controller. (KAC-7252 only) 9. Connect the negative - terminal of the battery.
2CAUTION
Front side cover
Hexagon socket head cap screw (M4 � 8 mm) Hexagon Wrench
Cooling fan
� Do not install in the below locations; (Unstable location, In a location that interferes with driving, In a location that gets wet, In a dusty location, In a place that gets hot, In a place that gets direct sunlight, In a location that gets hit by hot air) � Do not install the unit under the carpet. Otherwise heat build-up occurs and the unit may be damaged. � Install this unit in a location which allows heat to easily dissipate. Once installed, do not place any object on top of the unit. � The surface temperature of the amplifier will become hot during use. Install the amplifier in a place where people, resins, and other substances that are sensitive to heat will not come into contact with it. � This unit has cooling fan to decrease the internal temperature. Do not mount the unit in a place where the cooling fan and ducts of the unit are blocked. Blocking these openings will inhibit the cooling of the internal temperature and result in malfunction. � When making a hole under a seat, inside the trunk, or somewhere else in the vehicle, check that there is nothing hazardous on the opposite side such as a gasoline tank, brake pipe, or wiring harness, and be careful not to cause scratches or other damage. � Do not install near the dashboard, rear tray, or air bag safety parts. � The installation to the vehicle should securely fasten the unit to a place in which it will not obstruct driving. If the unit comes off due to a shock and hits a person or safety part, it may cause injury or an accident. � After installing the unit, check to make sure that electrical equipment such as the brake lamps, turn signal lamps and windshield wipers operate normally.
Self-tapping screw (ø5 � 18 mm) Installation board, etc. (thickness : 15 mm or more)
â� Remote controller (KAC-7252 only)
Mounting bracket Remote controller
Self-tapping screw (ø2.6 � 12 mm)
English
3
|
|
|
> |
|